FAQ
AutoResp™ error message "No boards have been configured"
When starting AutoResp™ and this error message appear, AutoResp™ was not installed with administrator rights. During the AutoResp™ installation process, a file must be copied into a Windows system folder. This requires an administrator login. Here is the instruction how to install the necessary file to get rid of the error message:
- Login as an administrator
- Download the following configuration file (LINK) and save the file to your desktop.
- Locate the folder folder: C:\ProgramData\Measurement Computing\DAQ\ . The folder Program Data is a system hidden folder. So you might have to change settings for the folder in order see hidden folders and system files. Hidden folders are shown as “transparent” in Windows’ file explorer.
- If the folder doesnt exist, please create it.
- Now move the file into this folder.
- After you moved the file, change folder settings again to hide hidden and system files.
- Start AutoResp™. The error message should be gone by now.
Ambient O2: NaN-error
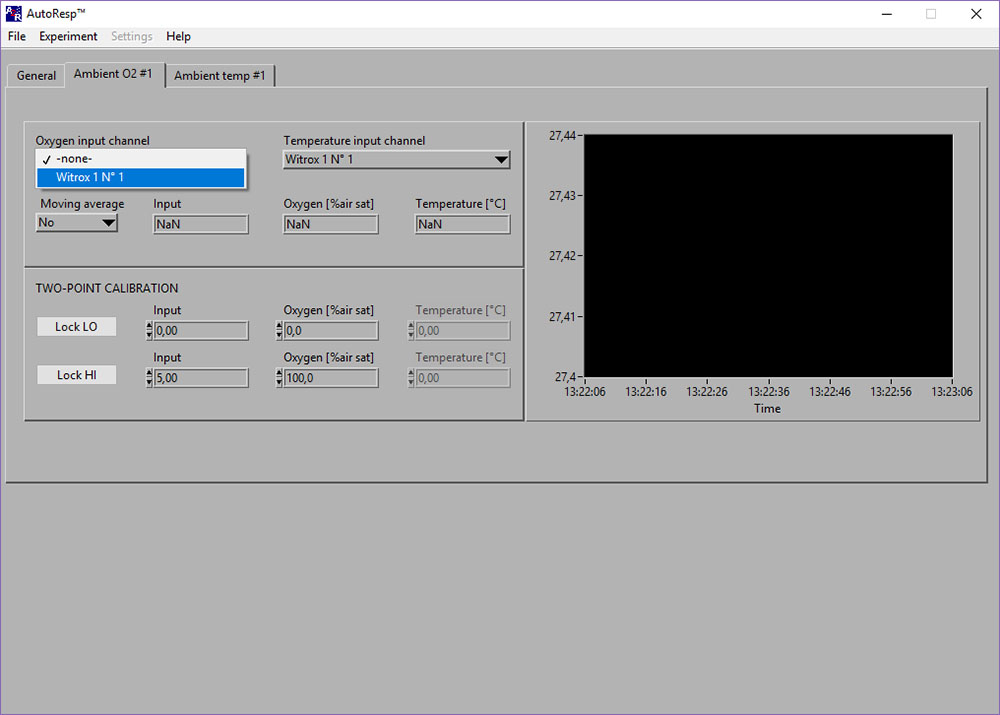
If the Input [phase], Oxygen [%air sat] and Temperature [OC] shows NaN (Not a Number), you should check the following:
- Select the right Witrox instrument for the Oxygen input channel (see image above)
- Select the right Witrox instrument for the Temperature input channel (for real-time compensation).
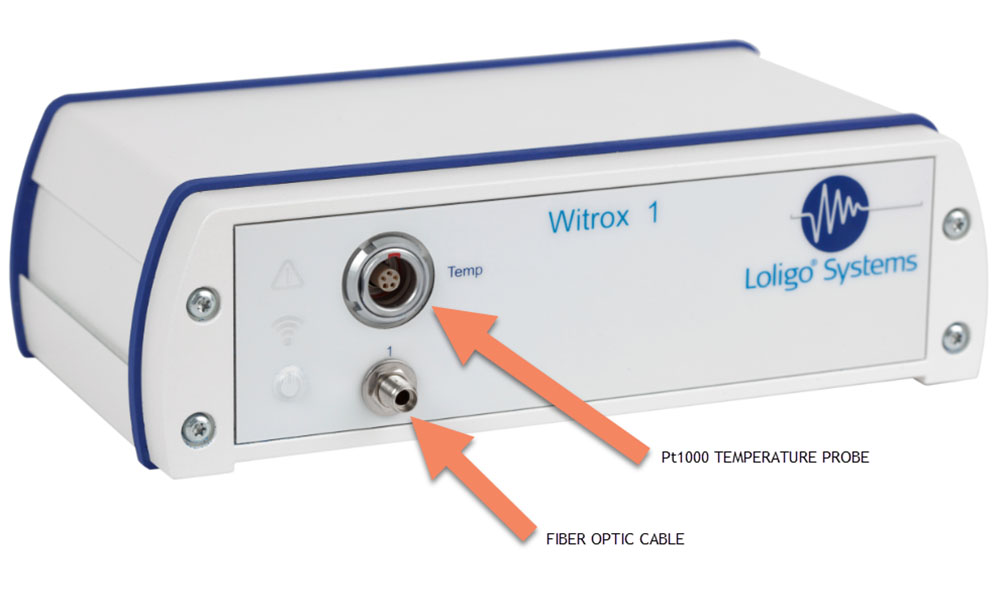
- Check that the fiber optic cable and the Pt1000 temperature probe (red mark on cable must match red mark on Temp input) is connected correctly to the Witrox instrument (see below):
The NaN should now be replaced by data values.
LinkAmbient temp: NaN-error

If the Input [phase] and Temperature [OC] shows NaN (Not a Number), you should check the following:
- Select the right Witrox instrument for the Temperature input channel (see image above).
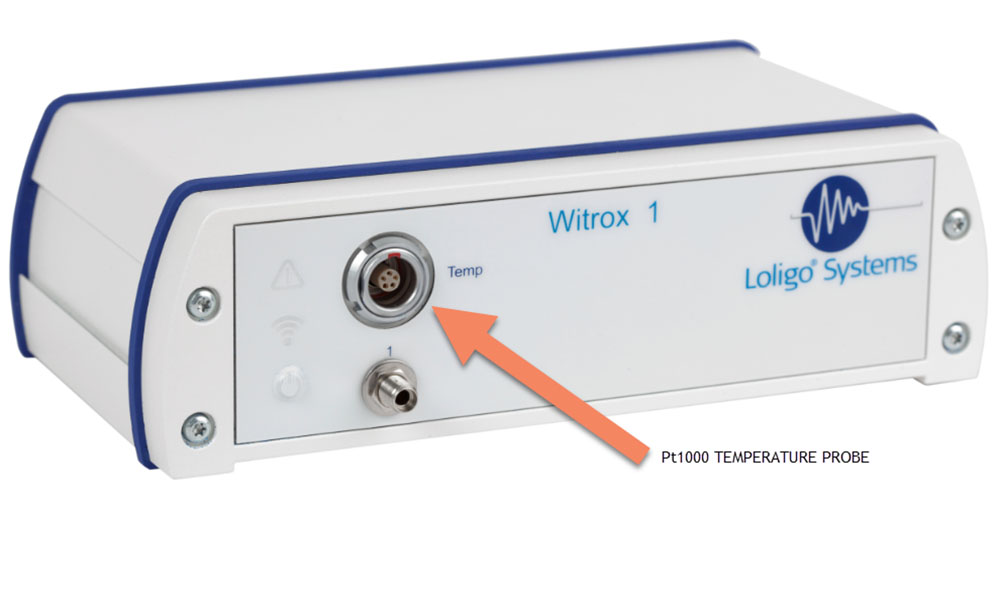
- Check that the Pt1000 temperature probe is connected correctly (red mark on cable must match red mark on Temp input) to the Witrox instrument:
The NaN should now be replaced by data values.
LinkDAQ-BT board number disappears when I select it in AutoResp?
If the Board number for the DAQ-BT disappears after having selected it, there could be two reasons:
- You have not selected the correct board number.
- A board number has not been configured for the device.
Solutions:
- Select the board number that has been configured for the instrument.
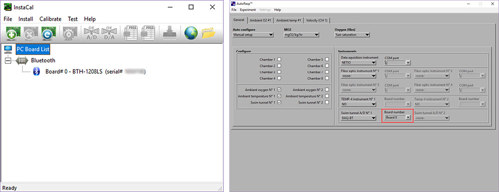
- Tip: Open the software InstaCal to check the correct board number (here Board# 0):
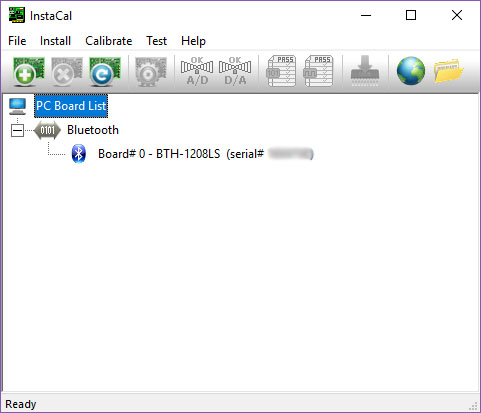
- Tip: Open the software InstaCal to check the correct board number (here Board# 0):
- Configure a board number for the DAQ-BT device.
- Exit AutoResp.
- Open the software InstaCal as administrator (right-click).
- InstaCal will now configure the instrument automatically. Click OK to the following message:
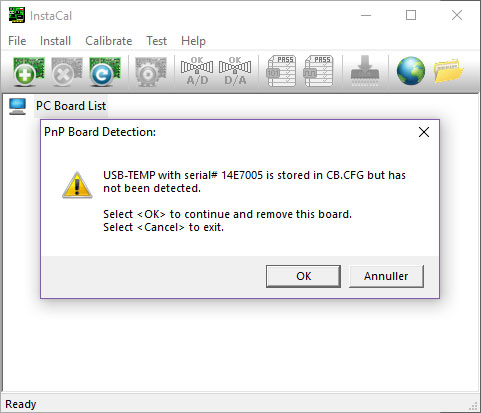
- Click OK to the following message:
- Use the board number you see here (e.g. Board# 0):
- Click File > Exit
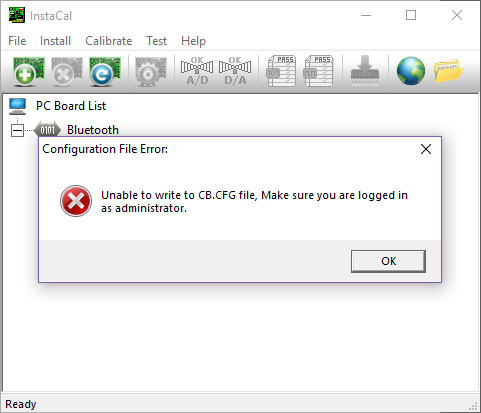
- If the following error message appears, you must exit InstaCal and open it again as administrator:
- Exit AutoResp.
Calibration error: Ambient oxygen No 1

ERROR: Instrument 1 (Please make sure the instrument is in range and turned ON)
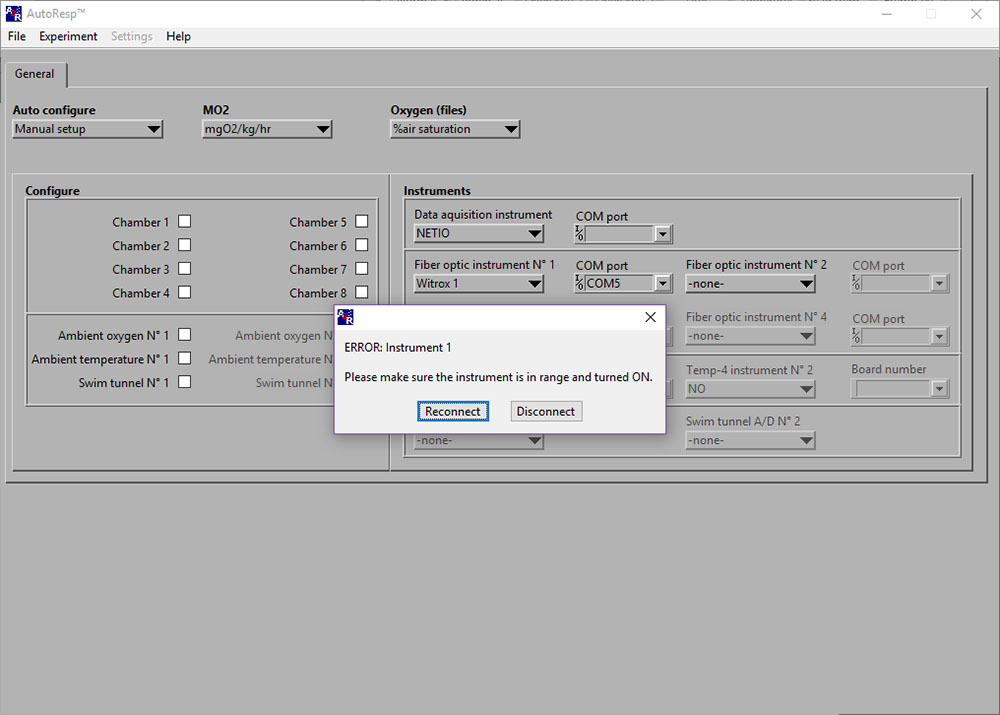
If the ERROR: Instrument 1 (or 2/3/4) appears, you should check:
- If you have selected the assigned COM port for the Witrox instrument.
- If the Witrox instrument is ON and within (Bluetooth) range of the computer.
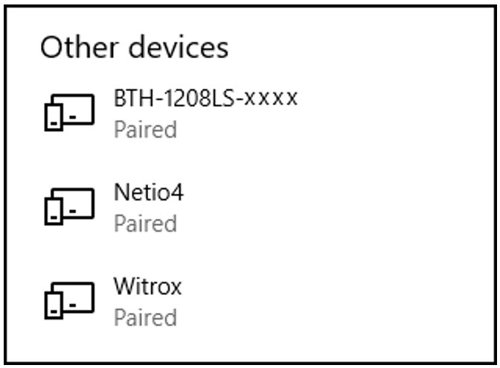
- If the Witrox instrument is paired with the computer.
- Tip: Check your connected Bluetooth devices list (see Other devices).
- If the Witrox instrument has timed-out (warning icon on the instrument will light red when timed-out).
Solution:
Close the error-window.
- To find the assigned COM, please try:
- In Windows 10: Go to Control Panel > Devices and Printers > Find the paired Witrox device > Right-click on the device icon > Choose Properties > Choose the Hardware tab > Look for the COM port under Standard Serial Connection via Bluetooth (COM#) > Use this COM-port in AutoResp™.
- Turn the Witrox instrument ON and secure a free line of sight to the computer avoiding metal or magnetic objects that can block wireless communication.
- To pair the Witrox instrument to your computer, please try:
- In Windows 10: Go to Settings > Devices > Add Bluetooth or other device > Choose Bluetooth > Look for Witrox and choose “Pair”. If Windows asks for a pairing code, use “0” (zero).
- Press the power button to turn the Witrox instrument OFF and exit the timed-out mode. Press the power button again to turn the Witrox instrument ON.
No COM port selected for fiber optic instrument No 1
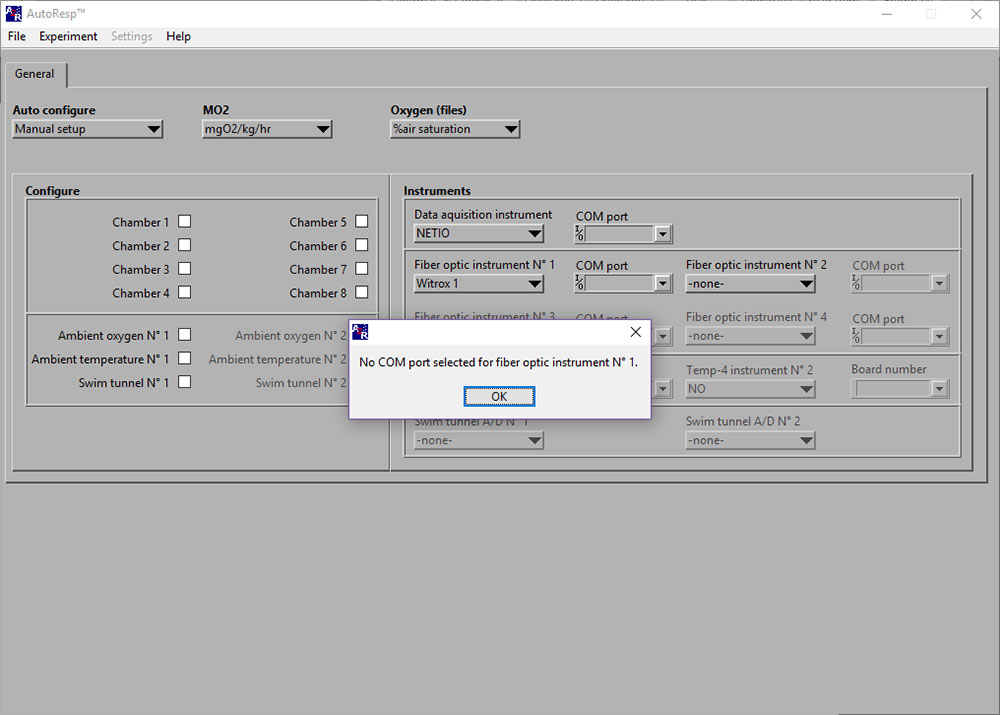
If the No COM port selected error message appears, you should check that you have selected the assigned COM port for the instrument indicated in the error window; here the first oxygen instrument, a Witrox 1.
LinkNo input for: Ambient oxygen No 1

If the No input for: Ambient oxygen No 1 error message appears, you should check:
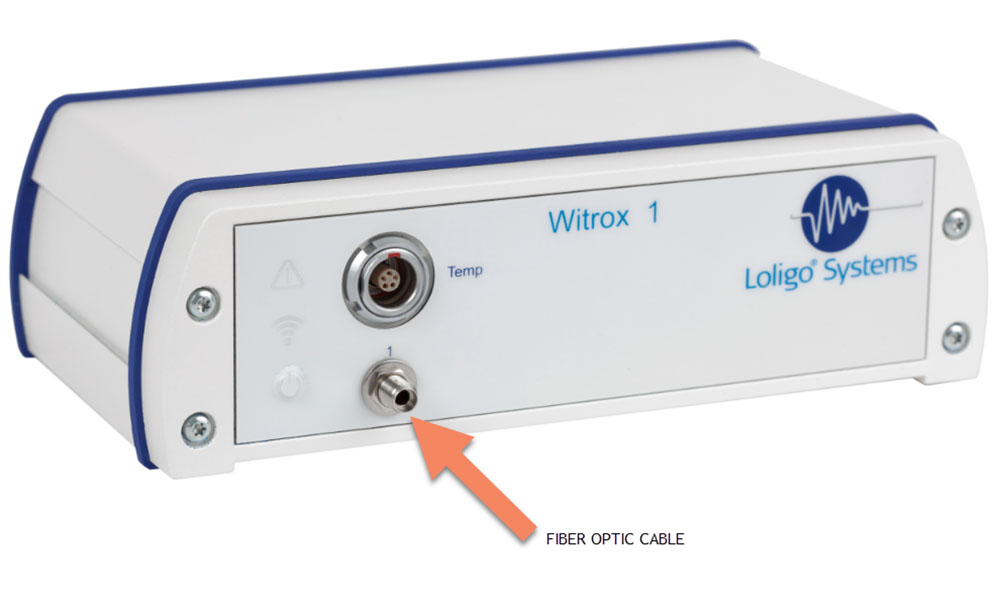
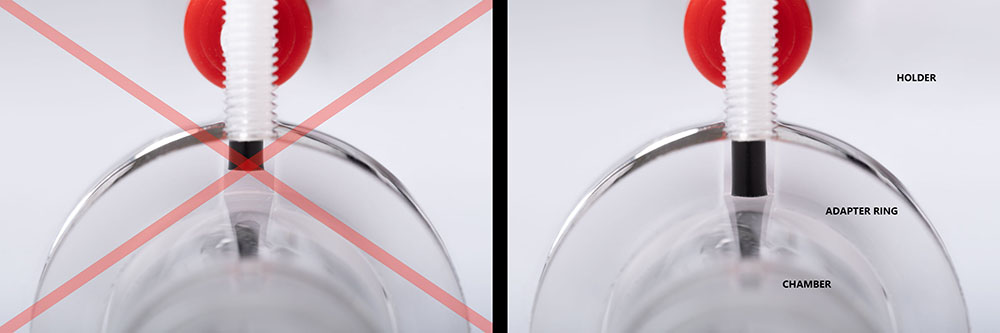
- If the oxygen sensor (fiber optic cable) is connected correctly to the Witrox instrument SMA connector:
- If the fiber optic cable is damaged.
- If the fiber optic cable is misaligned onto or at a distance from the sensor spot.
No input for: Ambient temperature No 1
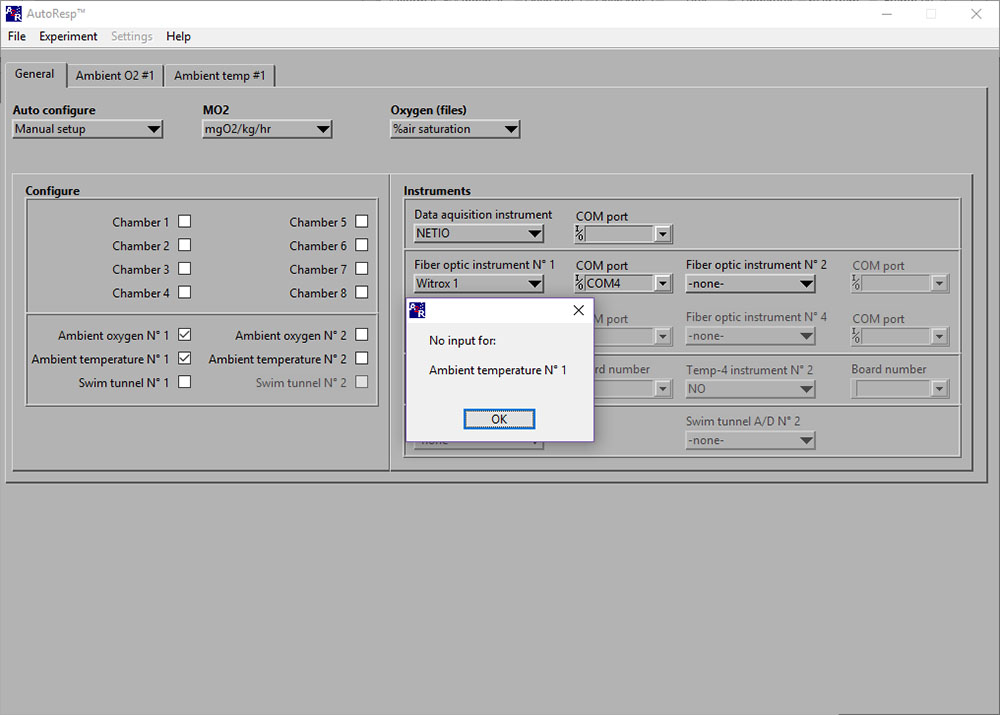
If the No input for: Ambient temperature No 1 error message appears, you should check that the Pt1000 temperature probe is connected correctly to the Witrox instrument (red mark on cable must match red mark on Temp input):
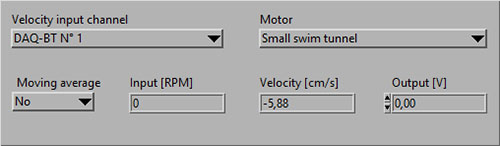
Velocity (CH #): NaN-error
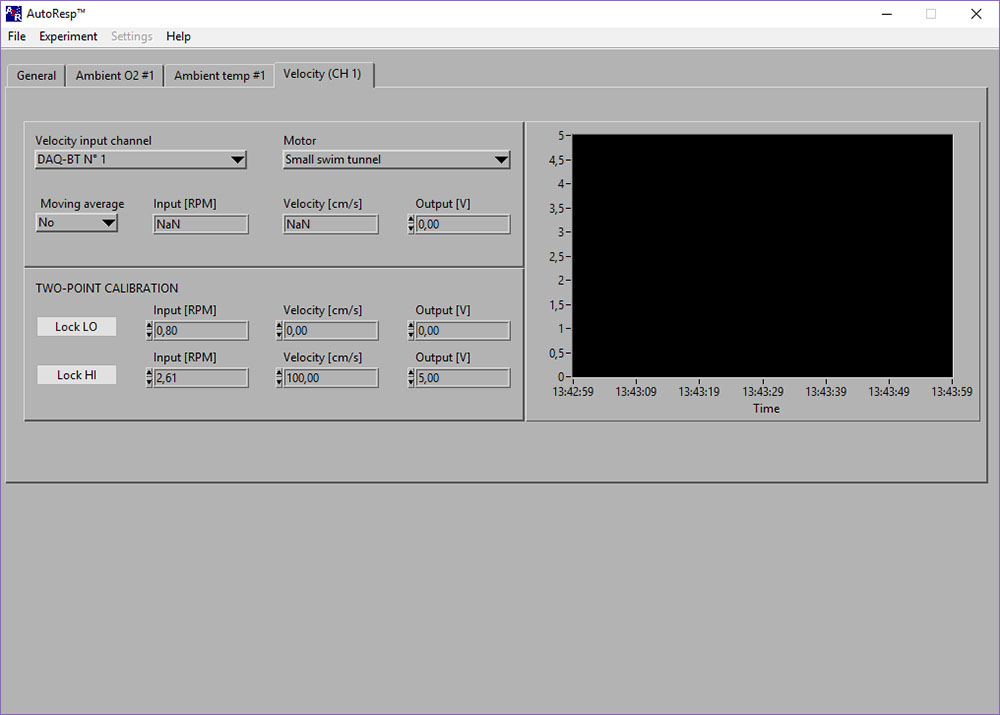
If the Input [RPM], Velocity [cm/s] or Output [V] shows NaN (Not a Number), you should check the following:
- That the motor controller is powered ON and set to FWD/Forward.
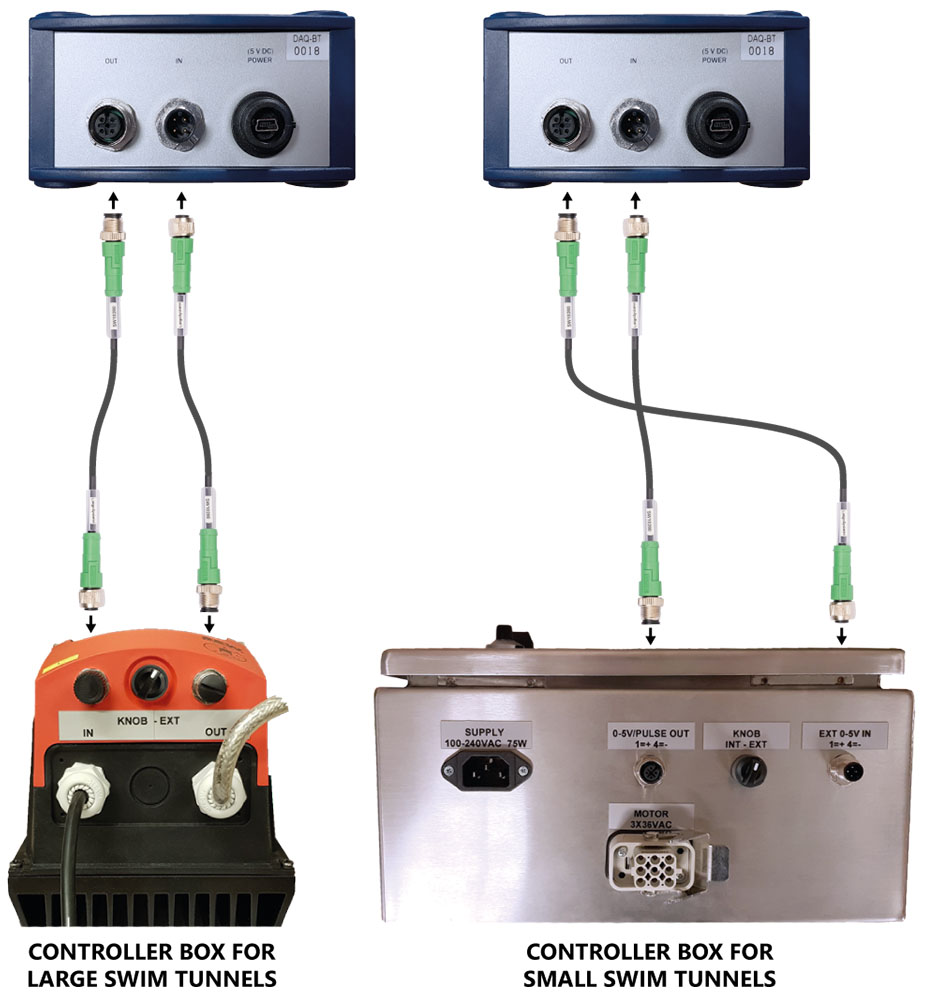
- That the OUT/IN on the back of the DAQ-BT is connected with the analog data cables to the IN/OUT on the motor controller:
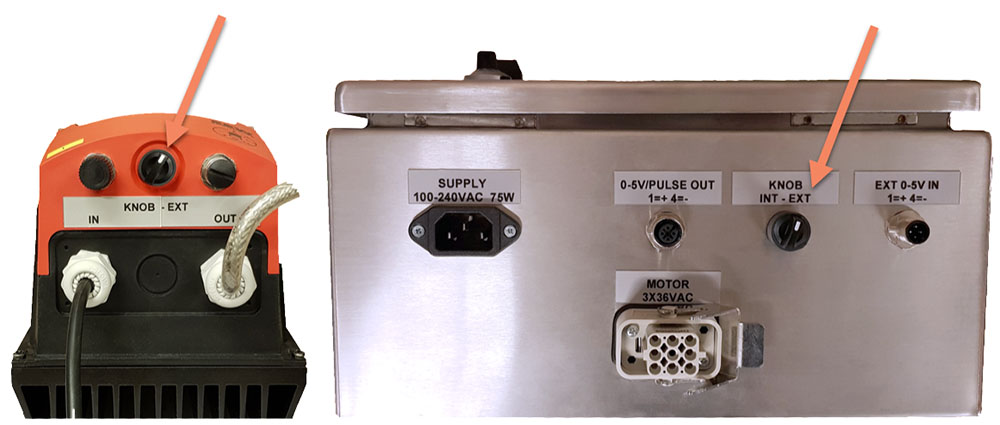
- That the knob on the motor controller is turned towards EXT:
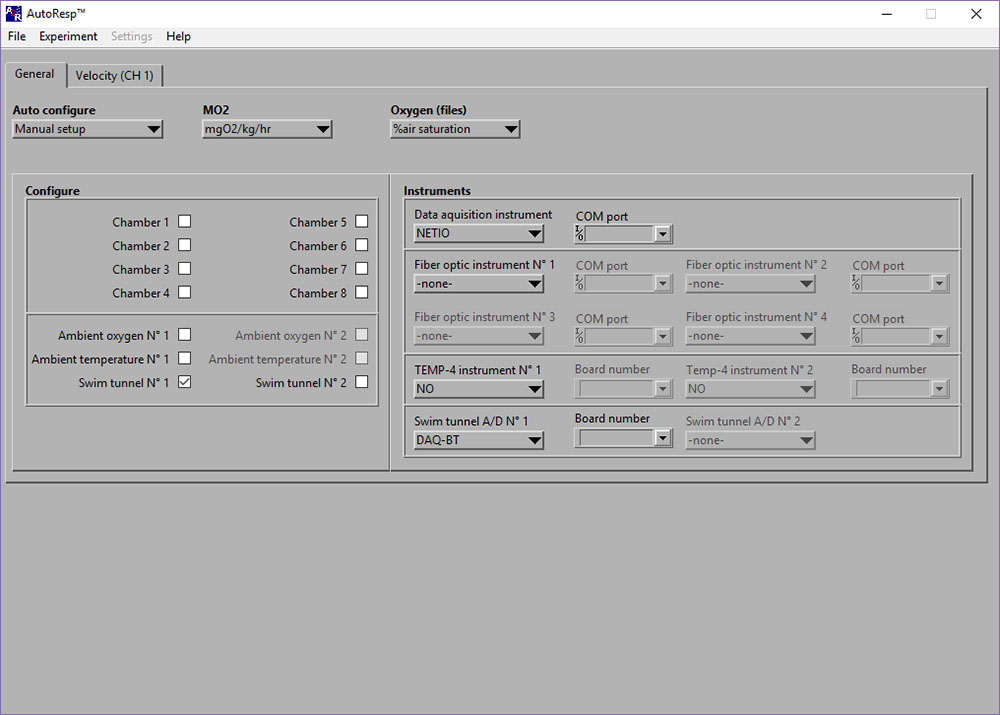
- That you have selected the DAQ-BT for the Velocity input channel and the correct Motor (type of swim tunnel):
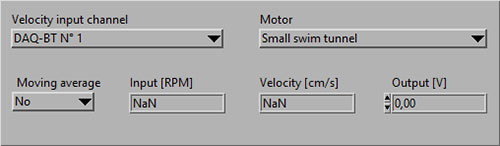
- You should now see data (RPM) values instead of NaN:
No device selected
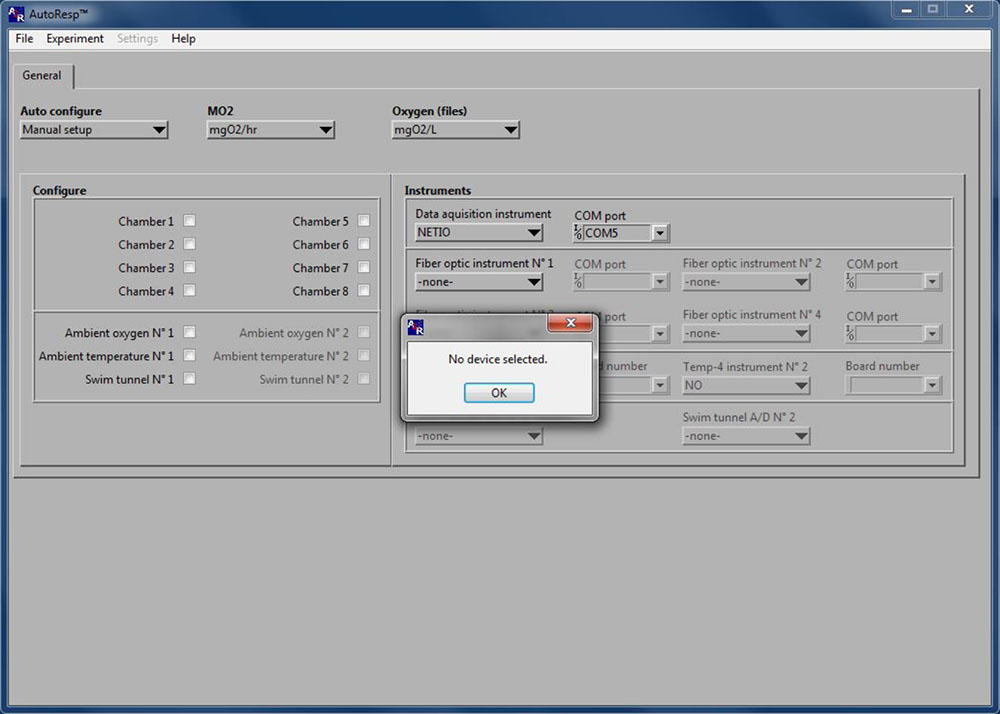
If the No device selected error message appears in AutoResp™ 2.3.0, you should delete the AutoResp configuration file:
NOTE: This will delete all setup settings in AutoResp™.
- Close AutoResp and all applications on your PC.
- In Windows, go to: My computer > Programs (x86) > AutoResp > Delete the CONF-file named AutoResp™.
- Open AutoResp™ as administrator (you should always open as administrator).
- The configuration file has now been reset and the error message should no longer appear.
How do I set up LoligoBT in AutoResp 2.3.0?
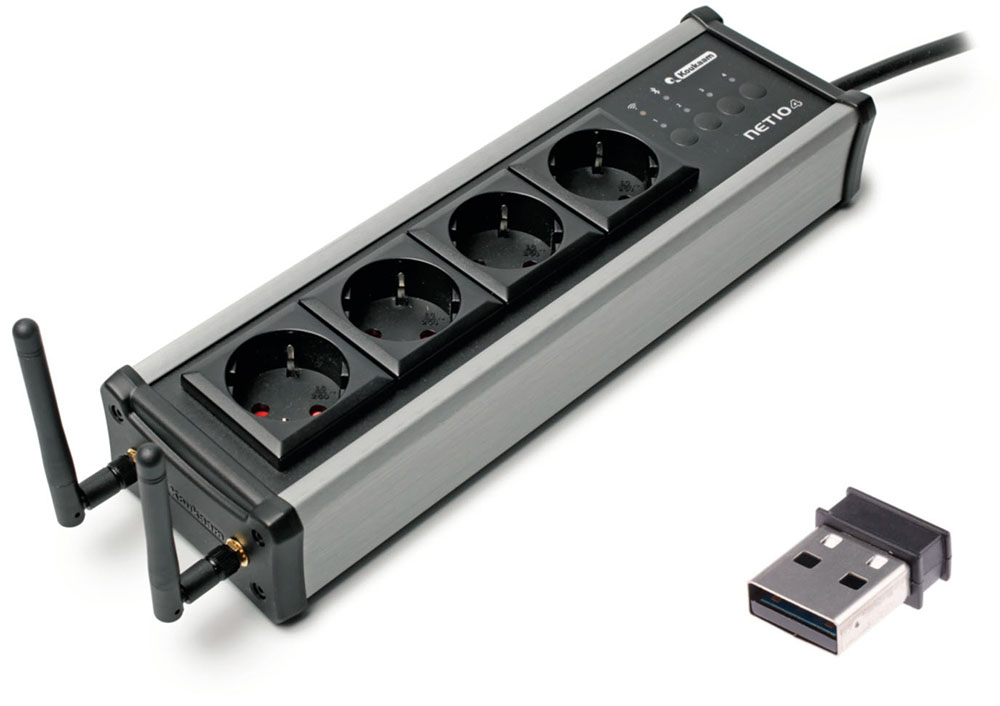
The LoligoBT is a 4-fold power strip that is powered from a wall outlet and communicates with a Windows computer via Bluetooth 4.0. LoligoBT is used for wireless software control of equipment connected to one of the four independent electrical sockets, i.e., relays turning pumps, valves, stirrers etc. ON or OFF from a distance.
Important
- DO NOT reset the LoligoBT device to factory defaults (see How to reset the LoligoBT/Netio device)!
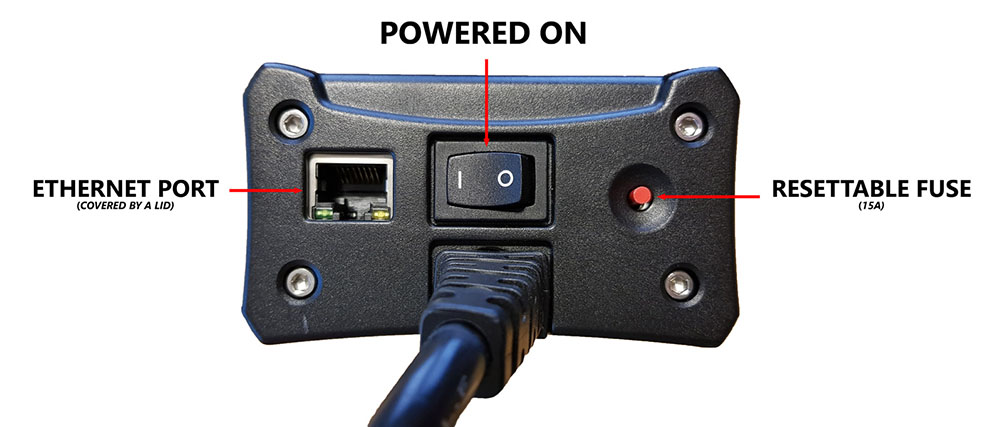
- The LoligoBT is equipped with an ethernet port. The port is covered by a lid. You should NOT remove this lid or connect an ethernet cable to the LoligoBT. It will reset the device and void the warranty!
Setup:
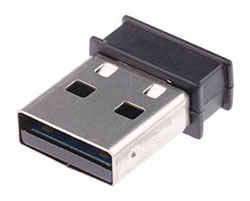
- Insert the small black USB dongle directly into your PC. Let the dongle configure itself in Windows.
- Connect the LoligoBT into a wall socket.
- Set the power switch to “l” to turn the LoligoBT on (see below):
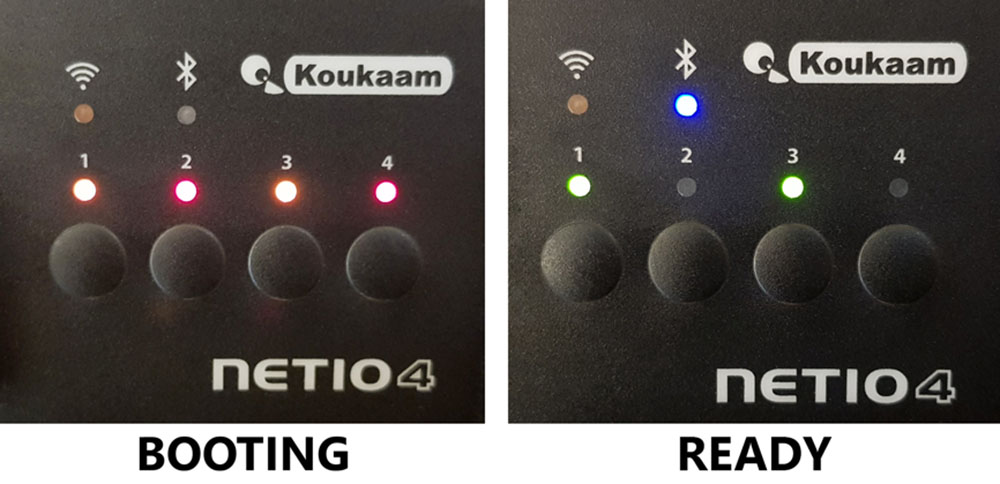
- Wait until the device is ready (see below). It takes about 50 seconds:
- COM port number: In Windows 10, go to Settings > Devices > Look for the BLUEGIGA BLUETOOTH LOW ENERGY (COM#) > Make a note of this COM port number.
- If Windows asks for a pairing code, use “123456”.
- If Windows asks for a pairing code, use “123456”.
- Open AutoResp™ as administrator (right-click).
- Select the right COM port number for this LoligoBT device.
- Your LoligoBT device is now ready to be used in AutoResp™.
How do I set up Witrox 1/Witrox 4 in AutoResp 2.3.0?
The Witrox instruments are used for measuring dissolved oxygen using fiber optic mini sensors (optodes) and for measuring temperature.
Important
- Do not use the free WitroxView software while running AutoResp™ on the same PC!
Setup
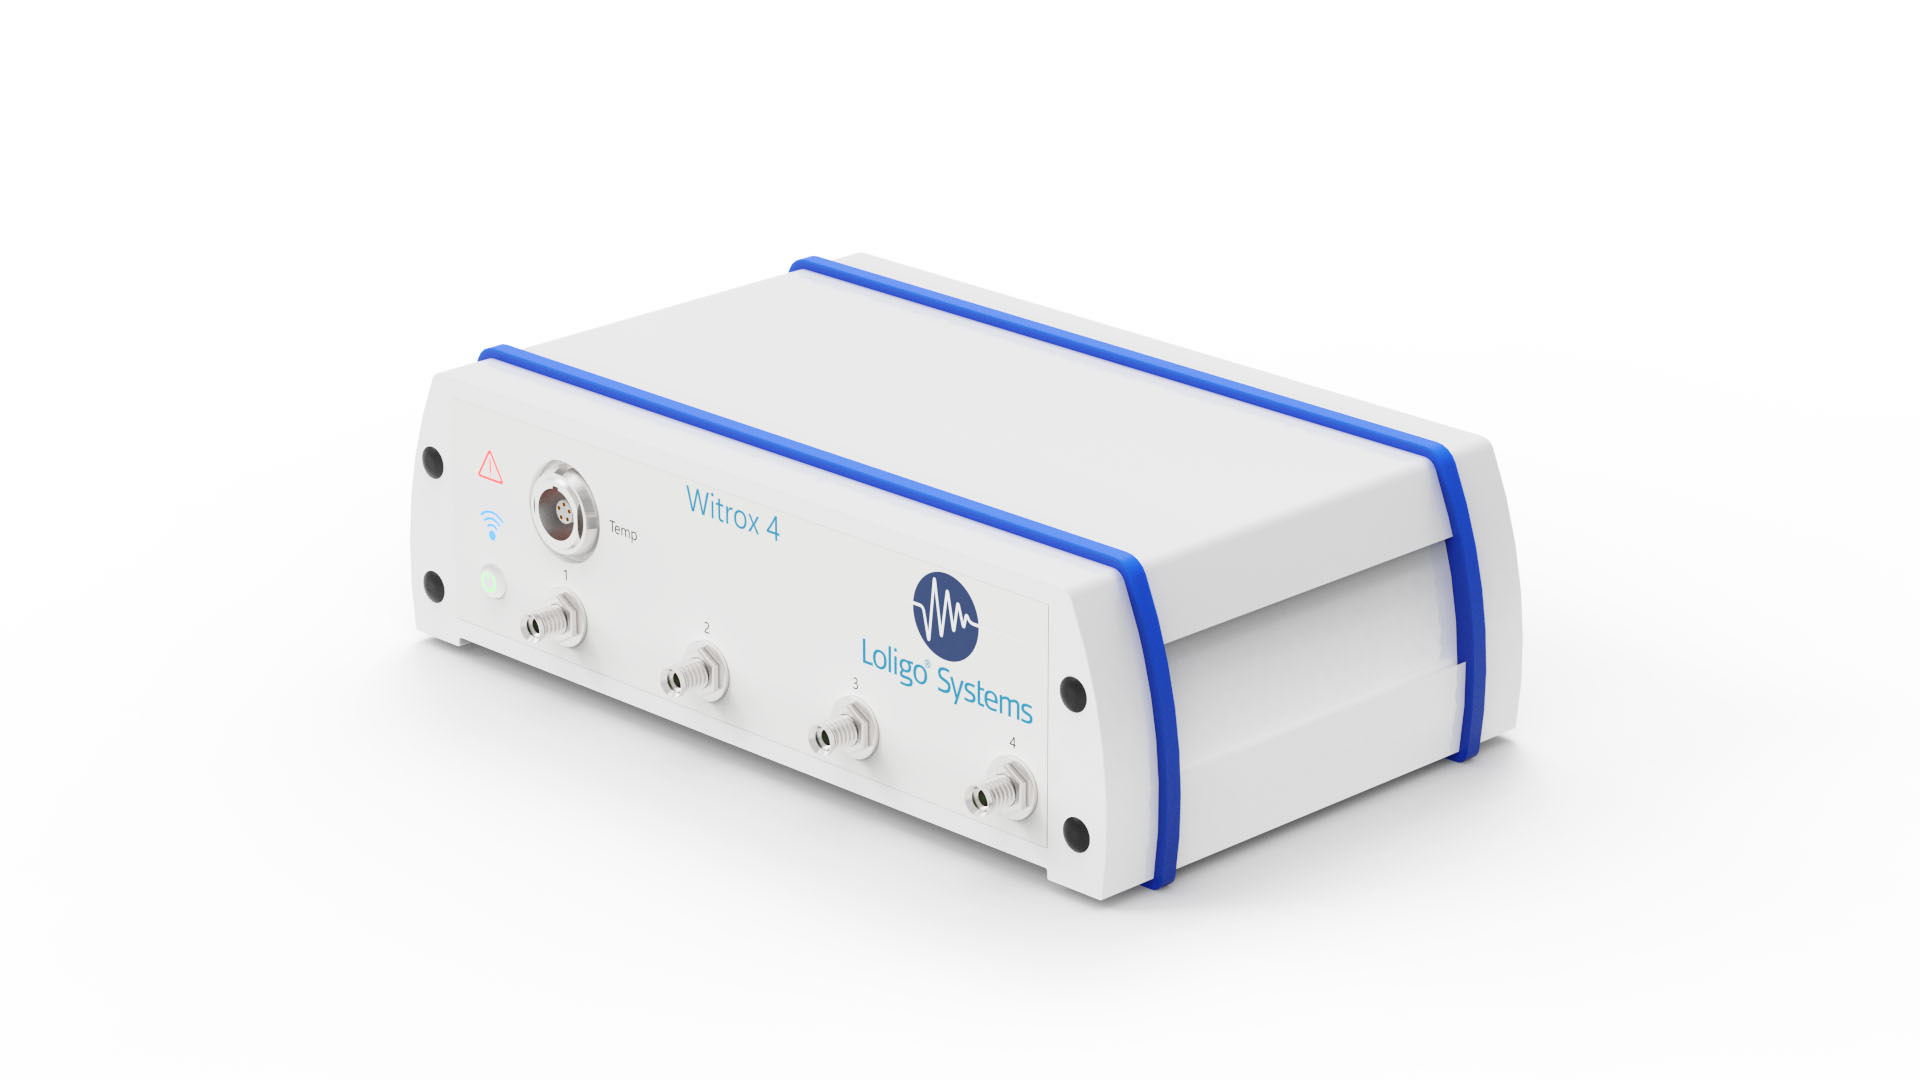
- To power the Witrox instrument, connect the DC adapter to a wall outlet and the USB power cable to the threaded socket on the backside of the instrument.
- Tip: You can power a Witrox instrument directly from your PC using a USB cable.
- Tip: You can power a Witrox instrument directly from your PC using a USB cable.
- Press the power button. The power LED will turn green. The link LED (wireless icon) will flash blue indicating that pairing mode is enabled.
- Pairing in Windows 10: Go to Settings > Devices > Add Bluetooth or other device > Choose Bluetooth > Look for Witrox and choose “Pair”.
- If Windows asks for a pairing code, use “0” (zero).
- If Windows asks for a pairing code, use “0” (zero).
- Verify that the Witrox is paired with your PC (under Devices in Other devices list).
- COM port number: In Windows 10, go to Control Panel > Devices and Printers > Find the paired Witrox device > Right-click on the device icon > Choose Properties > Choose the Hardware tab > Look for the COM port under Standard Serial Connection via Bluetooth (COM#) > Make a note of this COM port number.
- Open AutoResp™ as administrator (right-click).
- Select the right COM port for this Witrox instrument.
- Your Witrox instrument is now ready to be used in AutoResp™.
How do I set up DAQ-BT in AutoResp 2.3.0?
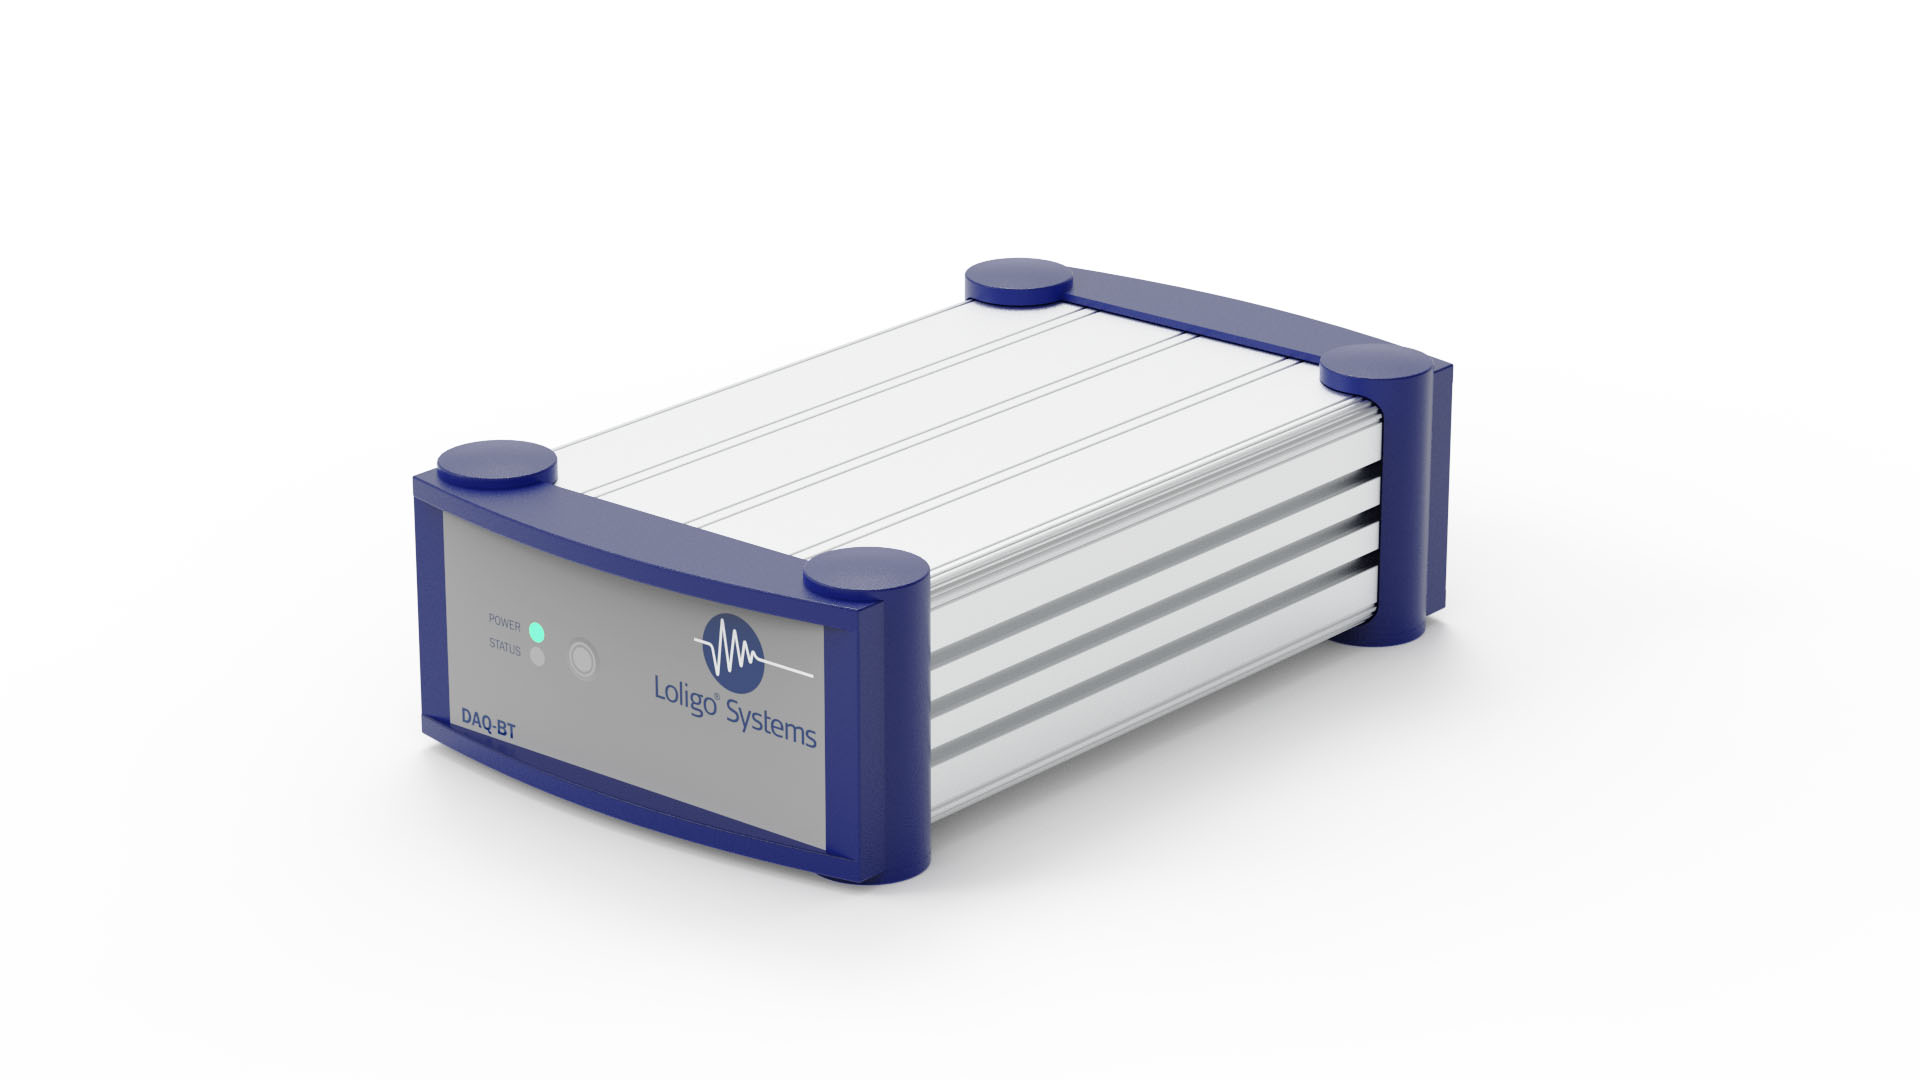
The DAQ-BT device is used for wireless data acquisition from and control of Loligo® swim tunnels. The built-in Bluetooth communication allows you to place the PC at a distance from the swim tunnel. The device has inputs and outputs for controlling and acquiring RPM data from the swim tunnel motor controller (VFC).
Setup
- To power the DAQ-BT device, connect the DC adapter to a wall outlet and the USB power cable to the threaded socket on the backside of the instrument.
- Tip: You can power a DAQ-BT instrument directly from your PC using a USB cable.
- Tip: You can power a DAQ-BT instrument directly from your PC using a USB cable.
- Press and hold the power button until the POWER and STATUS LED flash green. Pairing mode is now enabled.
- Pairing in Windows 10: Go to Settings > Devices > Add Bluetooth or other device > Choose Bluetooth > Look for BTH-1208LS-XXXX and choose “Pair”.
- If Windows asks for a pairing code, use “0000” (four zeros).
- If Windows asks for a pairing code, use “0000” (four zeros).
- Verify that the DAQ-BT is paired with your PC (under Devices in Other devices list):
- Open the program InstaCal (from Measurement Computing) as administrator (right-click).
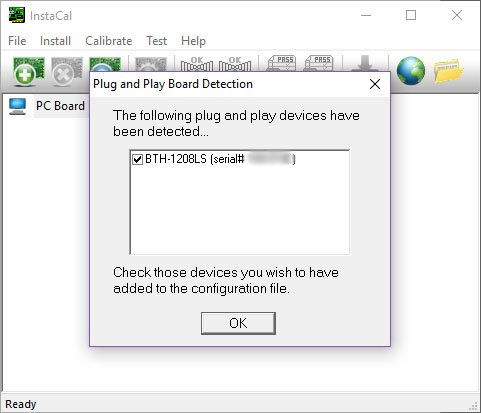
- InstaCal will now detect and configure the DAQ-BT instrument (see below). Click OK to the following message:

- Click OK to the following message:

- The assigned board number must correspond to the board number used in AutoResp™:
- Click File > Exit
- If the following error message appears, you must exit InstaCal and open it again as administrator:

- Open AutoResp™ as administrator (right-click).
- Select the right board number for this DAQ-BT device.
- Your DAQ-BT device is now ready to be used in AutoResp™.
WARNING: DO NOT reset the device to factory defaults!
Resetting the device to factory defaults will void the warranty and remove the pre-installed Loligo® firmware leaving the device unable to communicate with any Loligo® software.
Ways to reset the device (DON’T!!!)
The LoligoBT/NETIO4All device can be reset to factory defaults in two ways:
- By pressing and holding outlet buttons 1 and 2 when starting the device via power switch. Hold the buttons until the device beeps 3 times. During the resetting process, all the outlet LED are blinking red. As soon as reset is completed, the device beeps 3 times. Whole procedure takes about 2 minutes.
- By removing the protective cap from the ethernet port and connecting the device to a computer with an ethernet cable and resetting the device in your browser.
Contact our technical support if you experience connectivity or performance issue with the LoligoBT/NETIO4ALL.
Link