FAQ
What type of oxygen sensor should I use?
Loligo® Systems offers the three main types of oxygen sensors differing in measuring principle, response time, sensor size, maintenance requirement and pricing.
1. Optical oxygen sensors
For many invasive techniques, measurements in tiny volumes (e.g. micro respirometry) or applications which require high temporal and spatial resolution, fibre-optic oxygen sensors are the only solution.
Even for general purposes we recommend optical oxygen sensors featuring low maintenance requirements, high stability and accuracy, no electrical interference, no ground loop problems, and zero O2 consumption by the sensor.
The main disadvantages is price, single-channel meters start at about €3750. A high temperature sensitivity of this technology and a fragile tip on the <50-140 nm micro sensors might also be a problem in some applications. The macro sensors, on the other hand, are very tough.
2. Galvanic cell oxygen electrodes
Galvanic type oxygen probes are inexpensive and rugged sensors producing a milliVolt signal for easy instrumentation without supplying power.
We recommend galvanic probes for applications like respirometry and field measurements, and as a low-budget alternative to optical oxygen equipment, e.g. for multi-channel systems. They can be used with relatively long cables (+25 meters). We recommend using a galvanic isolation preamplifier between the probe and any data acquisition system to minimize possible ground loop problems.
The main disadvantage of galvanic probes is a relative long response time and oxygen self-consumption making them unsuitable for measurements in small volumes and in un-mixed samples.
3. Polarographic oxygen electrodes (or Clark type electrodes)
Low oxygen self-consumption and a small size make these sensors suitable for physiological setups like blood gas analysis and low volume respirometry.
However, Clark type electrodes require much maintenance, often membranes and electrolyte fluid should be changed on a daily basis, and polarographic amplifiers for these sensors are quite costly.
Thus, we recommend the E101 as a replacement oxygen electrode for customers with their own polarograhic oxygen meter, e.g. PHM meter from Radiometer Copenhagen, OM200 from Cameron Instr. Co. etc.
LinkHow to calibrate an oxygen sensor?
CALIBRATION PRINCIPLE
Instrument calibration is an essential first step in analytical and measurement procedures. The rationale for a two-point calibration is to provide two points of reference with which to calibrate the instrument and, therefore, ensuring accurate measurements with your sensor of the unknown concentrations of your samples. A two-point calibration between two extremes are advocated, e.g. 0 - 100 % air saturation. For the low calibration point, we recommend using either nitrogen gas or sodium sulphite solution, for the high calibration point, bubble atmospheric air using an aerator. Please see below for general step-wise instructions on how to carry out a two point calibration. For specific instructions for a particular oxygen instrument, please click on the specific links.
GENERAL
- Connect the probe to the oxygen instrument and turn on the instrument.
- Place the tip of the probe in a mixed air-equilibrated water sample. This can be achived by purging atmospheric air into sample water, e.g. with an air pump and air stone.
- Wait for the reading to stabilize. Then save this point as the HIGH calibration value (100% air saturation).
- Place the tip of the probe in an oxygen free water sample (e.g. by purging nitrogen gas into sample water or by dissolving ~10 grams of Na2SO3 in 500 mL of distilled water).
- Wait for the reading to stabilize. Then save this point as the LOW calibration value (0% air saturation).
- Rinse the probe with distilled water.
- Place the probe into the sample, and record the sample oxygen saturation when the reading is stable.
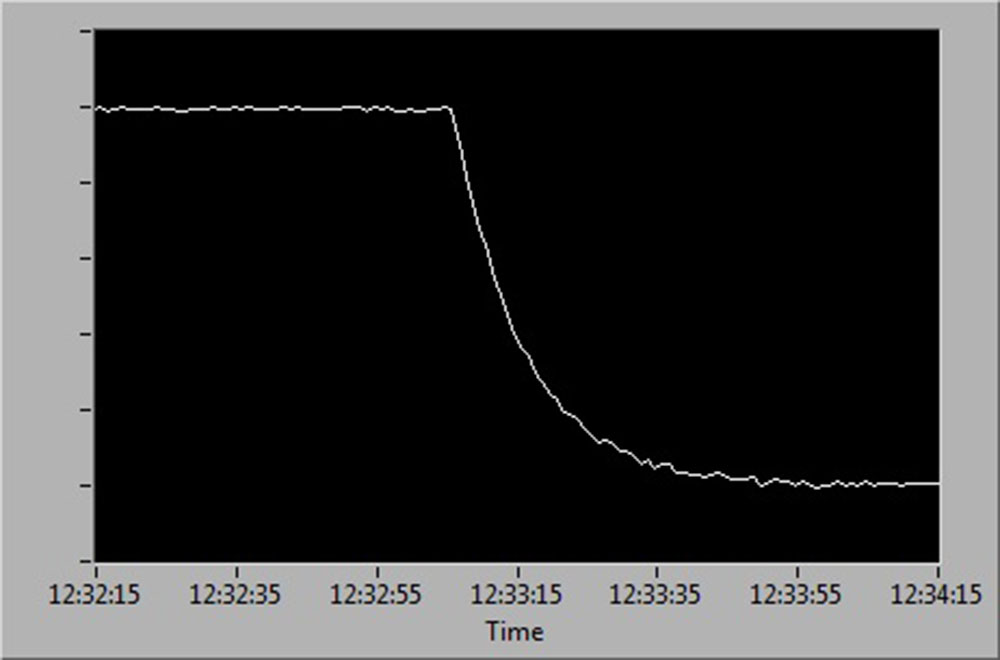
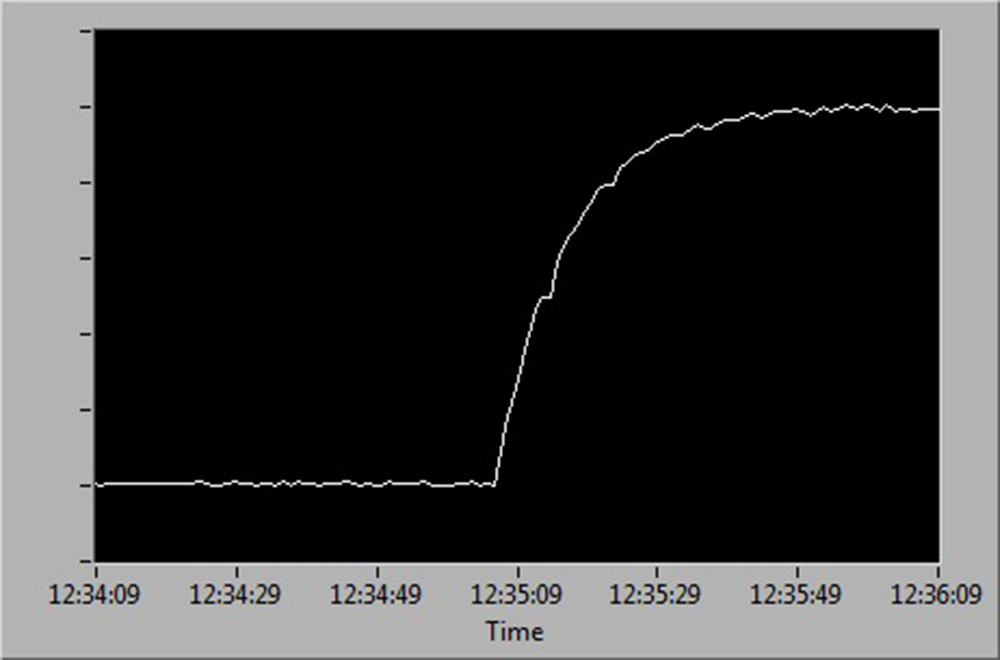
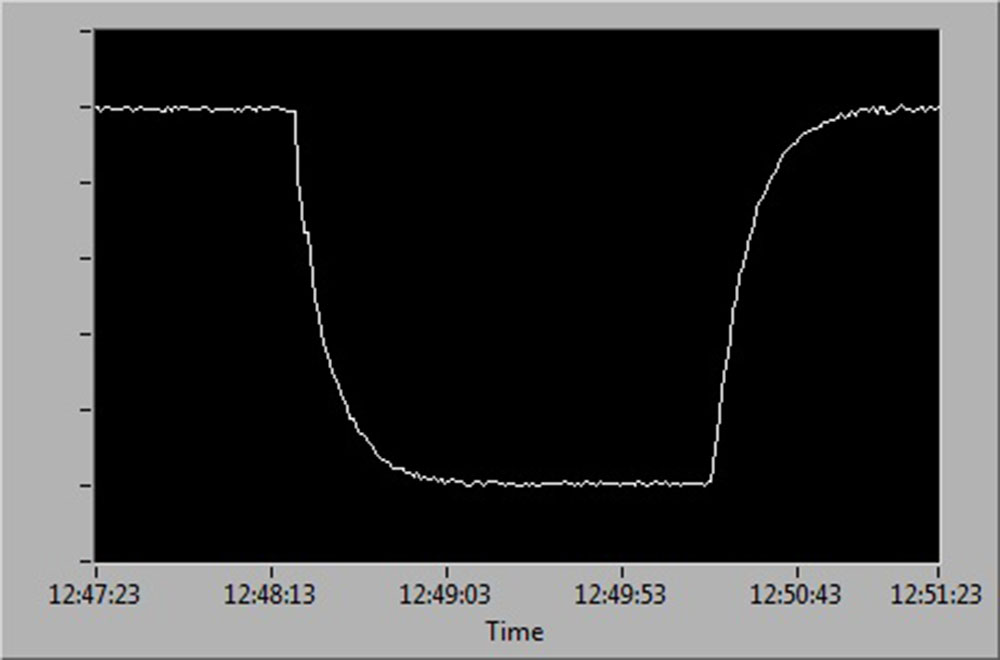
See below for a diagrammatic representation of sensor readings at:
- 100 % to 0 % air saturation
- 0 % to 100 % air saturation
- 100 % to 0 % and back up to 100 % air saturation.
 |
 |
| 100% to 0% air saturation | 0% to 100% air saturation |
 |
|
| 100% to 0% to 100 % air saturation | |
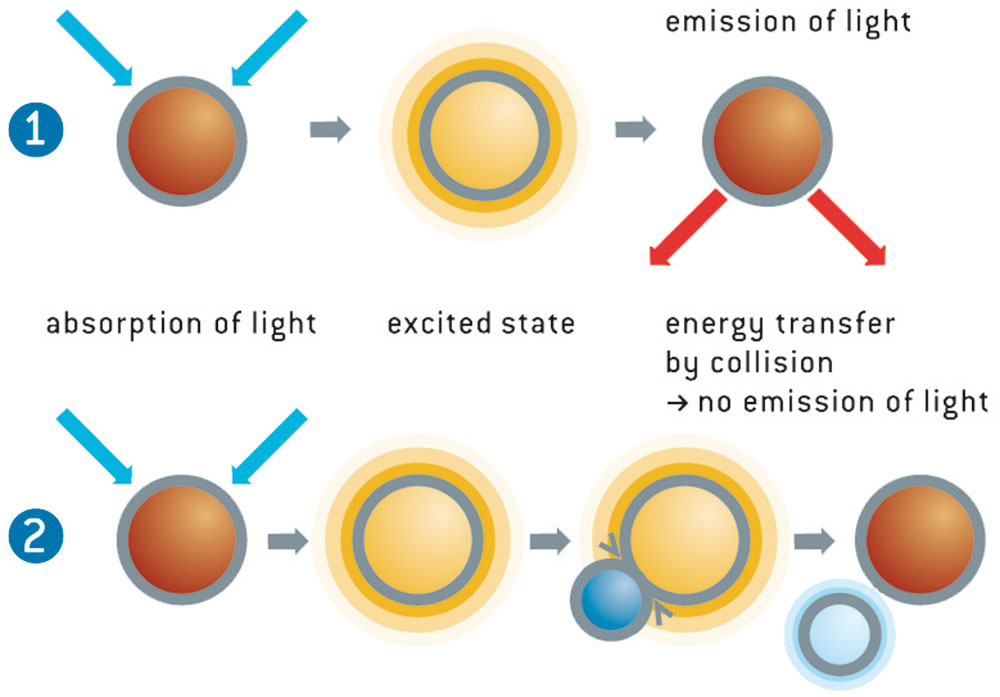
How do optodes work?
The light from the blue-green LED excites the oxygen sensor to emit fluorescence. If the sensor spot encounters an oxygen molecule, the excess energy is transferred to the oxygen molecule in a non-radiative transfer, decreasing or quenching the fluorescence signal. The degree of quenching correlates to the partial pressure of oxygen in the matrix, which is in dynamic equilibrium with oxygen in the sample. The decay time measurement is internally referenced.
Amplitude and Sensor Health
Optical oxygen sensors, also known as optodes, work by emitting red fluorescence from the sensor when excited by blue light from the light source of the instrument. The intensity of this red fluorescence, known as the amplitude, can be used to assess the health of your oxygen sensor. As the amplitude decreases, the quality of the measurement deteriorates as the signal-to-noise ratio is reduced.
Amplitude naturally decreases over time through a process known as bleaching. Under proper use, these sensors can remain functional for more than a decade. However, exposure to strong UV light, such as certain indoor lighting or direct sunlight, accelerates bleaching, causing the amplitude to drop rapidly, shortening the sensor's lifespan.
For sensor spots such as PSt3 and PSt5, which are used in our resting chambers and microplates respectively, the signal amplitude is reduced when the light emitter is not positioned directly over the sensor spot. Therefore, we always recommend double-checking the alignment between the emitter and the sensor in these systems.
As a rule of thumb, when the amplitude falls below 10000, sensor readings become less reliable due to higher technical variability. We recommend changing the sensor at this point for optimal data quality.
Once the amplitude drops below 3000 the sensor should no longer be used. At this stage the reproducibility and stability of the readings cannot be trusted.
Link